
Testing
Post-Remediation Clearance Testing Explained
Clearance testing is the check at the end of a mold job that tells you the work area is clean and dry enough to close up and rebuild. Here's what it involves and how to read the results.
What clearance testing is
Post-remediation clearance testing is an inspection done after mold removal and before the containment comes down, to confirm the work area is clean, dry and back to normal conditions. It usually combines a visual inspection for remaining growth and dust, moisture readings on the materials that were wet, and air or surface samples sent to a lab. If the area passes, containment is removed and rebuilding can start. If it doesn't, the area is cleaned again and retested.
It exists so that you aren't asked to take anyone's word for it. A room can look finished and still have fine dust or residual spores that a sample would catch.
When it happens in the process
Timing matters. Clearance should happen after removal and cleaning are finished, after the area has been HEPA vacuumed and wiped down, and after air filtration has run long enough to clear the air, but while containment is still in place and before any new drywall, insulation or paint goes up.
Testing after walls are closed defeats the purpose. If something was missed, it's now behind new material.
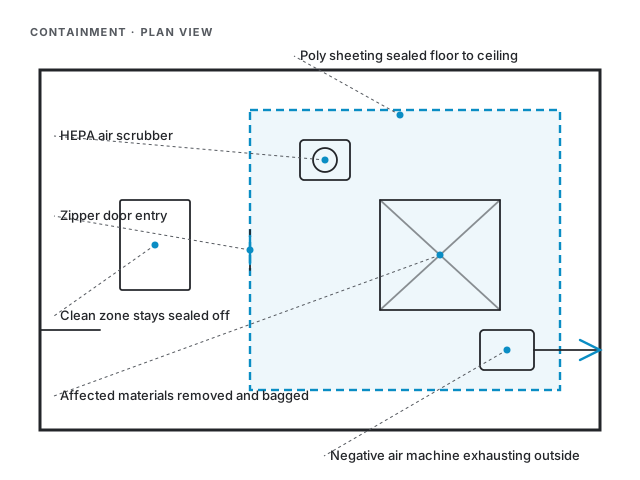
For how clearance fits into the rest of a job, from setup to rebuild, see what to expect during mold remediation.
The parts of a clearance check
1. Visual inspection
This comes first and is the most basic test. Inside containment, surfaces should show no visible growth, no staining that indicates remaining mold, and no settled dust or debris. Framing that was cleaned should look clean in the cracks and at the edges, not just on the face. If there's visible dust or growth, sampling waits until it's cleaned up.
2. Moisture readings
Wood and other materials that were wet are checked with a moisture meter. They should read dry, in line with similar unaffected materials elsewhere in the building. Clean but damp framing that gets closed up is set up to grow mold again.
3. Air sampling
Air samples draw a measured volume of air through a cassette that captures spores. Samples are typically taken inside the containment and outdoors, and sometimes in an unaffected room indoors for comparison. The lab counts and identifies spore types in each.
4. Surface sampling
Tape lifts or swabs from cleaned surfaces show whether mold structures remain on the material itself. These are useful on framing or other surfaces that stayed in place and were cleaned rather than removed.
How results are read
There is no single federal number that defines a pass for indoor mold. Results are interpreted by comparison and judgment, which is why it helps to understand what the person reviewing them is looking at.
- Indoor vs outdoor
- Indoor spore counts in the work area should generally be similar to or lower than outdoors, since a clean, filtered room shouldn't have more spores than outside air.
- Types of spores
- The mix indoors should resemble the outdoor mix. A type that is common inside but rare outside, especially one that grows on wet building materials, suggests something was missed.
- Surface samples
- Cleaned surfaces should show little or no mold growth structures.
- Visual and moisture
- No visible growth or dust; materials dry. Lab results don't override a failed visual.
Who should do the testing
Many property owners prefer clearance to be done by someone independent of the company that did the remediation, so the people grading the work aren't the same people who did it. That arrangement is common and reasonable, and some lenders, insurers or property managers ask for it. Either way, the sampling plan should be set before the work is finished, so it's clear what counts as a pass.
Our mold testing page covers the sampling methods in more detail, including testing before remediation to understand the problem and testing after to confirm it's done.
What happens if clearance fails
A failed clearance isn't unusual, and it isn't a disaster. It means the area needs more work before it's closed up.
Find out why
Was it visible dust, a damp area, or high counts of a specific spore type? Each points to a different fix.
Re-clean the affected areas
Usually another round of HEPA vacuuming and wiping, sometimes more material removal if growth was found deeper than expected.
Keep filtration running
Air scrubbers continue running inside containment to bring spore counts down.
Retest
The same sampling approach is repeated so the results can be compared.
If a moisture problem turns up at this stage, that has to be corrected before retesting. Cleaning a wet area just resets the clock.
Questions to ask before your remediation starts
- Will there be clearance testing, and who will do it?
- What does the clearance include: visual, moisture, air, surface samples?
- Will containment stay up until results come back?
- What happens, and who pays, if the first clearance doesn't pass?
- Will I get a copy of the lab report and an explanation of it?
These questions are part of any well-run mold remediation project, and a contractor should be comfortable answering all of them up front.
Seeing or smelling mold? Call and describe what you're dealing with. We'll tell you what it likely means and arrange an inspection. Phone answered 24/7.
Dealing with mold right now?
Talk to a mold remediation specialist
If this guide sounds like what's happening in your home or building, call us and we'll talk it through. You can also read how we handle mold testing.
Phone answered 24 hours a day, 7 days a week